The movement of the tides may dictate daily life on Zanzibar, but the island’s historical life owes more to another natural phenomenon – the winds. The first colonisers to blow in on the breeze were Arabs and Persians in the 9th century. Their dhows brought previously unknown spices, citrus, and tropical fruit, but by the 15th and 16th century, with Portuguese colonisation sweeping East Africa, dhows were replaced by galleons, and recently acquired South American staple foods such as maize and manioc were added to the mix. Next to arrive were the Omanis whom, courtesy of established trade routes with India, introduced new East Asian spices, and established Zanzibar as in important port in the global spice trade. Along with the spices came the recipes to utilise them, and, by the end of the 17th century, samosas, curry, masala, and biryani were being made in kitchens all over the island, adapted to suit the local ingredients, and influenced by the Arabian and Portuguese inflected cuisines that had come before.
The menu below attempts to make the most of this unique and extraordinarily rich culinary heritage, by starting each recipe with a similar set of ingredients and spices readily found on Zanzibar. The trick then, has to been to try and take each recipe in its own direction by featuring a particular spice or ingredient more predominately amongst the others, such that this ingredient is ‘showcased,’ so to speak. The beef is all about cloves (Zanizbar’s most important spice both historically and at present in terms of trade); the octopus about star anise and woody cinnamon; and the chicken influenced by Indian cuisine and defined by its strong use of cardamom. The other thing that I have varied in order to make each dish unique is cooking time. A long cooking time gives the beef a melting texture, the octopus is grilled to add flavour before cooking in spices and coconut milk, while the chicken is marinated for a long time before being cooked only for the time necessary.
If you want to make these dishes all together, as part of a big feast, they’ve been designed to each offer something a little different and work together well. Otherwise, pick and choose, and serve with the vanilla pumpkin or pilau rice, or both, on the side!
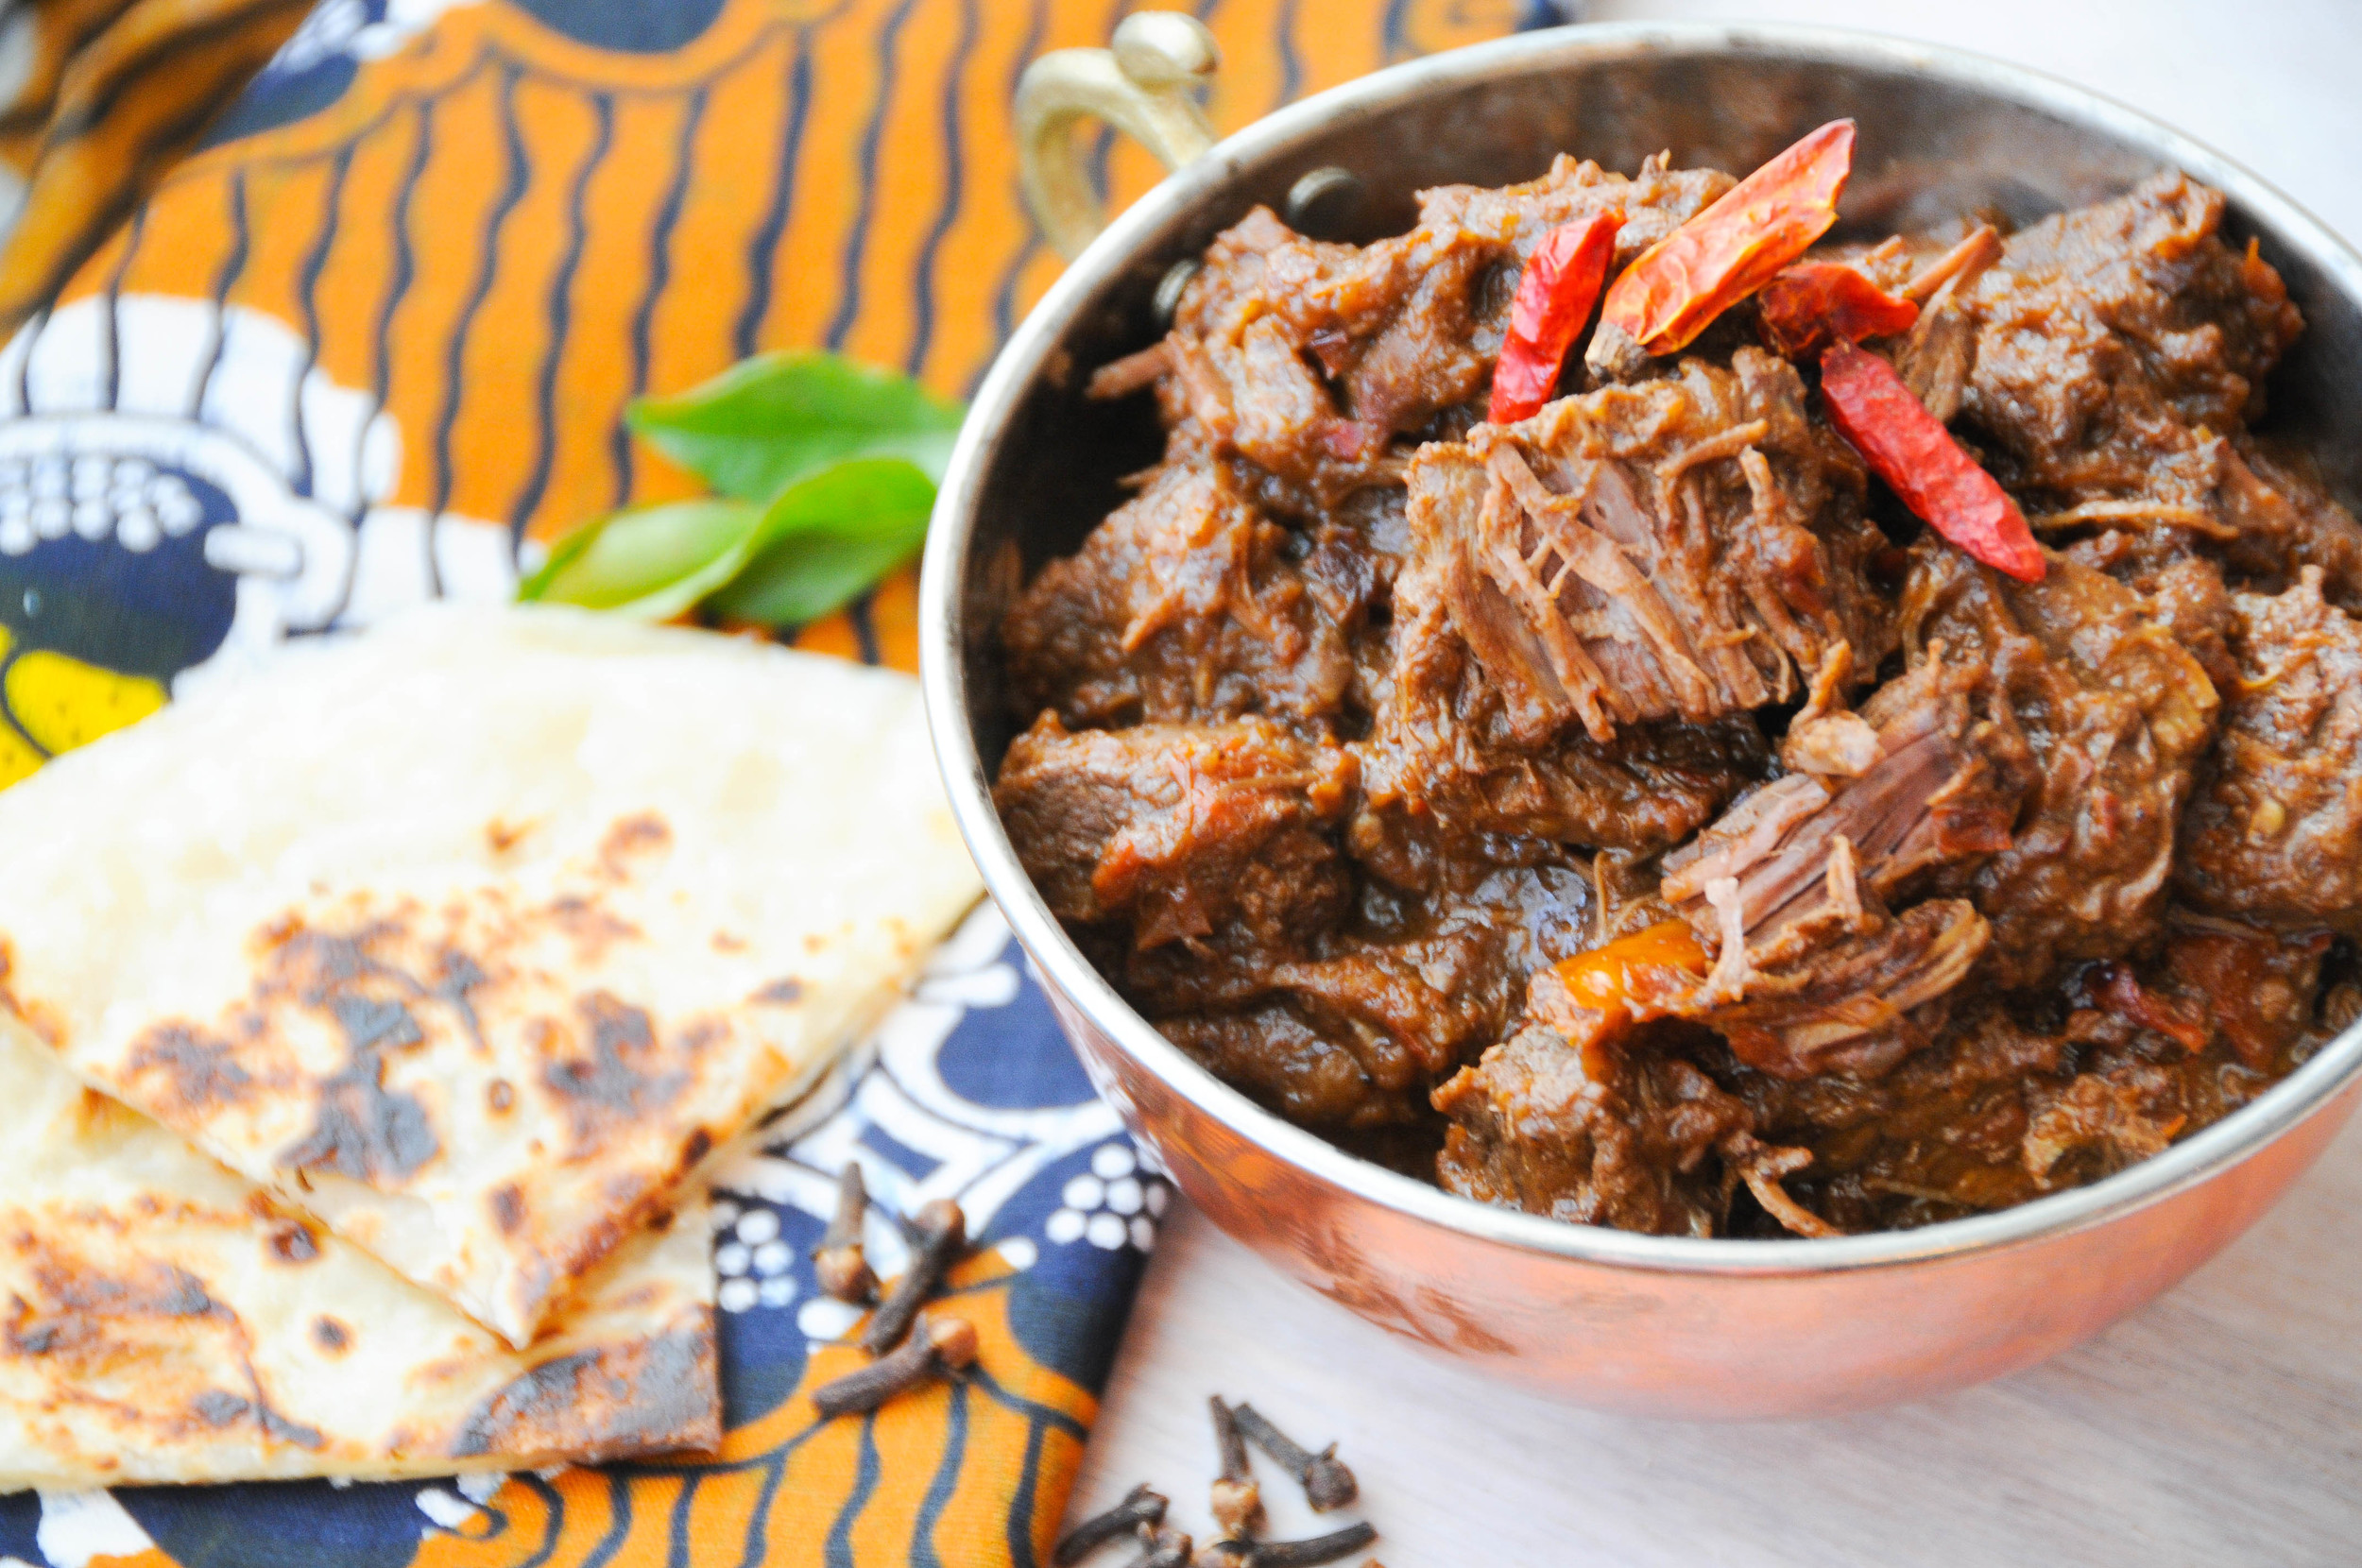
Slow-Cooked Spice Beef Curry
There is something I always enjoy about any dish that needs to be cooked for a long time. Perhaps it’s that, having prepared the ingredients long before, it is almost a pleasant surprise when hours later there is suddenly a completely transformed and ready-to-eat pot of delicious food sitting on the stove. This, and the lovely smell that emanates the whole while, and the soft texture of meat that can be broken apart with a spoon too of course - all good things.
I made this dish using tiny dried Zanzibari chillies called pili pili hohoo. These are great as they are full of flavour and look beautiful, and dangerous, atop the finished dish. They are of course very very hot, so if using either these, or a similarly small and potent dried chilli, it’s a good idea to count them in to the dish, and then count them out at the end. How many to use is up to you – I’ve suggested four, which is a little on the conservative side, but means one for each diner as a kind of garnish on the dish. Do position on the very top of the plated dish if you choose to use, as here your diners will be sure to see them, and can make any manoeuvres they deem necessary to avoid the potent little parcels!
Ingredients
(Serves 4 as a main course)
- 1kg braising streak – cut into large, i.e. 4cm, cubes
- 1 teaspoon cloves
- 1 teaspoon ground cinnamon
- ½ a nutmeg
- 5 tablespoons of sunflower or canola oil
- 1 large red onion - roughly chopped
- 4 cloves garlic - crushed
- 3cm piece of ginger - peeled and finely chopped
- 1 large red chilli - de-seeded and finely chopped
- 1 dried red chilli
- 4 dried pili pili hohoo (or similar) - optional
- 3 plum tomatoes - roughly chopped (approx.. 320g)
- 2 heaped tablespoons tomato purée
- 2 teaspoons paprika
- 200ml boiling water
- 1 tablespoon of brown sugar
- Salt & freshly ground pepper
The first job is to briefly toast the spices to ensure that these are at their most fragrant and flavourful. To do this, start by grinding the cloves into a powder using a mortar and pestle. Then, using a fine grater, grate half a nutmeg into the mortar as well. Heat a small, dry frying pan over a low heat, and pour in the ground cloves and grated nutmeg, as well as the teaspoon of ground cinnamon. Lightly toast for 2 minutes, or until the spices become aromatic. Take care not to keep the spices on the heat beyond this stage, as they do burn easily. Place the spices aside momentarily and continue to prepare the other ingredients.
Take a large, heavy-based, casserole pan (cast iron is ideal) and place it over a medium heat. Add 2 tablespoons of the oil, and allow to heat before adding the chopped onion. Fry until the onion begins to colour, then add the fresh ginger and red chilli. Continue to fry, letting the ginger and chilli start to cook, and stirring to ensure that the onions do not stick. Crumble in the dried chilli, seeds and all (this dish is intended to have a bit of heat), and cook alongside the other ingredients. The onions should have darkened quite a bit at this point, and almost have begun to caramelise a little. Unlike a lot of dishes, where the intention is to just sweat the onions without really colouring them, for this dish we are trying to get the onions to brown and release their sugars, creating a sticky, spiced base for the curry.
When mixture is almost at this stage, add the crushed garlic (which doesn’t quite have the long tolerance for frying as the other ingredients we’ve added), and continue to cook until the garlic has lightly browned. Scrape everything into a bowl, and put aside to be re-introduced again shortly.
Take care when cutting the beef into cubes to remove any connective tissue, or hard seams of gristle or fat, as these can be quite unpleasant to come across amongst the soft and easily broken apart texture of the finished dish. Once you are happy with meat, put the same heavy-based casserole pan back onto the stove-top and heat the remaining 3 tablespoons of oil on a high flame. Brown the beef in batches to avoid over-crowding the pan, and season each batch with salt and pepper as you go, (I find that adding the seasoning to each batch also helps in estimating the right amount). We are looking to only just sear the beef until it is brown on all sides, once you’ve achieved this, immediately remove the beef to a plate, and add the next batch.
Now, to put everything together. First, reduce the heat under the casserole pan to medium and add the onion mixture, then all of the browned beef. Cook together for a minute, before adding the tomato paste, paprika, and half of the toasted spice mixture (the other half will be added later). Cook another minute longer, stirring to combine everything, then add the fresh chopped tomatoes, brown sugar, pili pili hohoo chillies (if using), and boiling water. Bring to the boil and, once bubbling, cover with a lid and turn the heat down to a low simmer.
The beef can now be cooked for anywhere between about 2½ to 4 hours, depending on how much time you have. If you are content to cook the meat very slowly, you could even place it covered in the oven at 160˚C to quietly blip away while you get on with other things. All you need to do is stir occasionally and keep an eye on liquid levels. The finished curry is not intend to have a great deal of sauce – the texture is more meaty and sticky – but if things look like they are getting too dry, don’t hesitate to top up with a bit of water.
Lastly, about 30 minutes before you are ready to serve, add the reminder of the ground toasted spices. This is a little unorthodox, but it really helps keep the flavour of spices at the forefront. You could also use this opportunity to do a little salt and pepper check, and adjust if necessary.
To serve, dig out the little hot chillies, and place the curry into four deep bowls. Pop a chilli prominently on top of each – think of it as a warning flag! If you are feeling particularly energetic, you could fry some chapatti to serve alongside. For how to make these, see the samosa recipe from Part I. The same dough mixture, lightly fried on both sides, makes a very tasty chapatti.
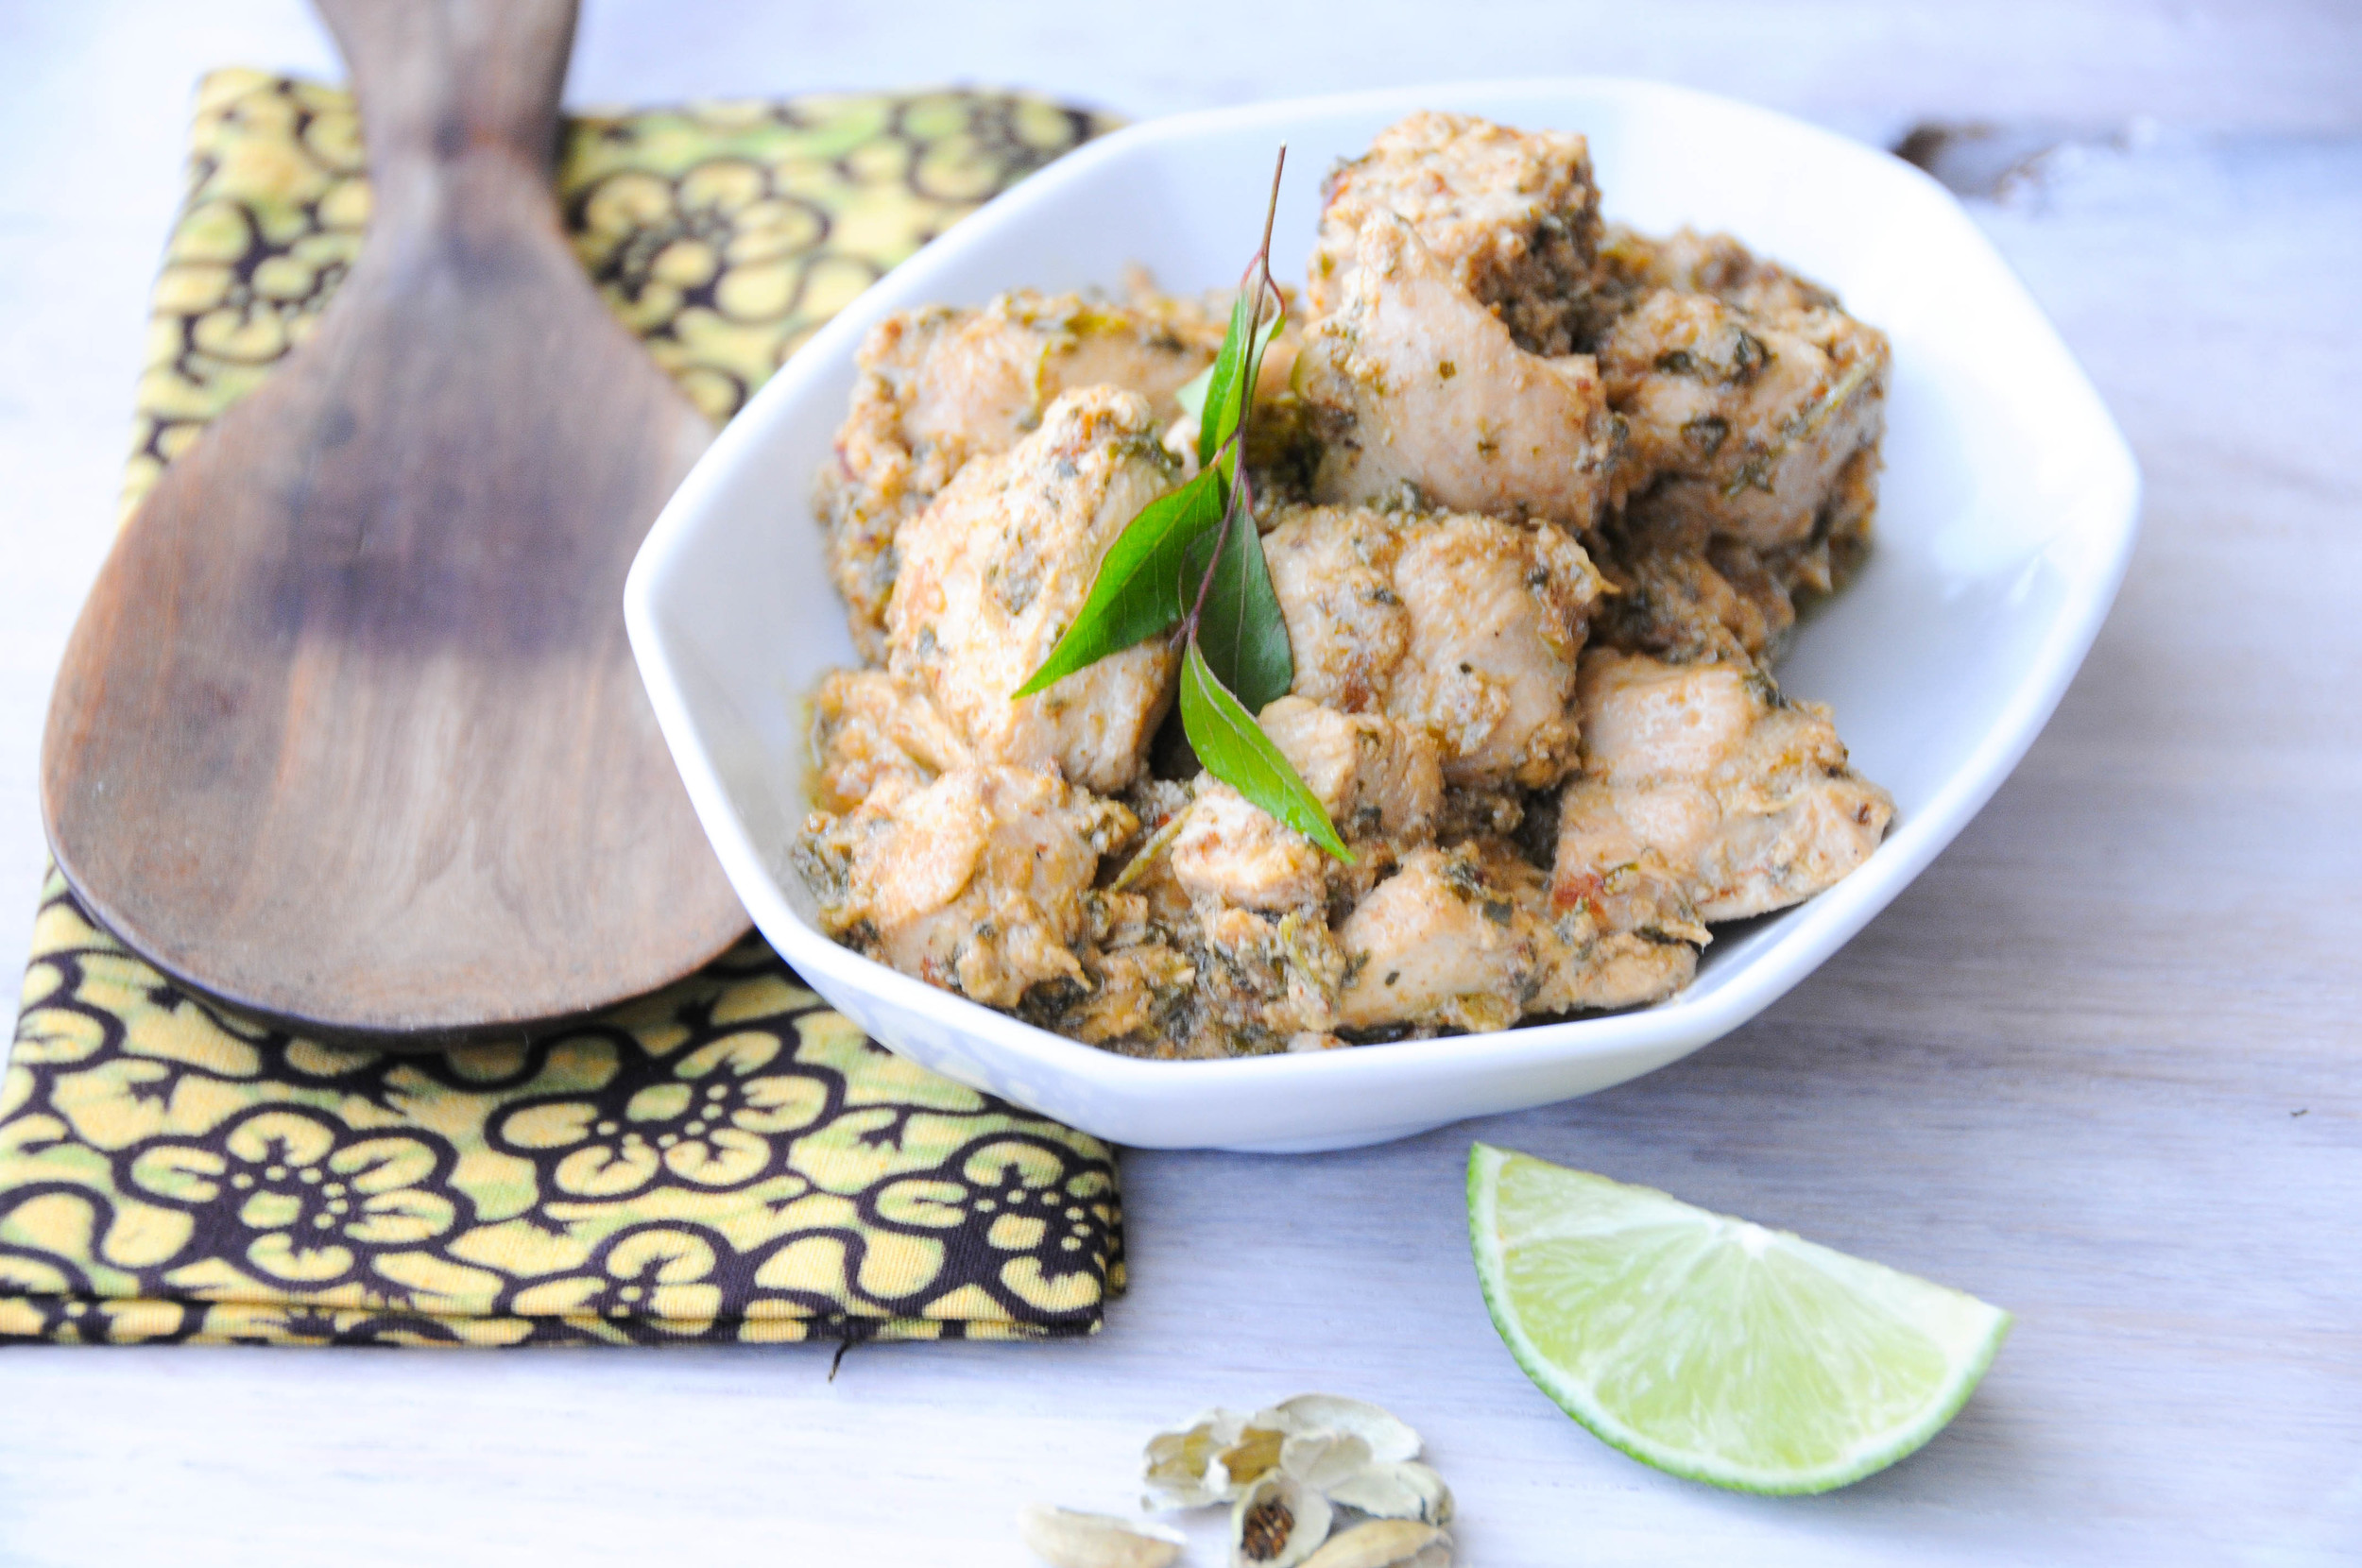
Cardamom Chicken
If you are thinking that the number of cardamom pods required by this dish sounds like an awful lot – you’re right. And the extra step of adding more cardamom towards the end of cooking really ensures that the whole cardamom effect is not subtle – but that’s kind of the point of this dish. If you don’t love cardamom, I wouldn’t recommend giving this a try, but if you do, I think it is kind of nice to have a dish where its unique flavour really stands out, and is complimented by the other ingredients, like lime, fresh coriander, green chillies, and curry leaves.
If you have an outdoor barbeque, this dish would work really well cooked on this. If you are inside, either a griddle pan, or just a plain old fry pan will also work just fine.
Ingredients
(Serves 4 as a main)
- 1kg free-range chicken breast – cut into 3cm cubes
- 10 cardamom pods
- 1 teaspoon coriander seeds
- Small amount of canola or sunflower oil for cooking
- 8 small curry leaves
- 1½ brown onions
- 7cm piece of ginger - peeled and finely grated
- 2 cloves of garlic - crushed
- 2 mild green chillies - finely chopped
- 3 heaped tablespoons of natural yogurt
- Salt & pepper
- 3 limes - 2 juiced, the third to juice and garnish.
- Small bunch of fresh coriander
To prepare the marinade for the chicken, begin by removing the cardamom seeds from their pods. Discard the outer pods and add the cardamom seeds, along with the coriander seeds to a mortar and pestle. Crush both spices together until you have a fine and fragrant powder.
In a small, dry frying pan, heat the spices together over a low heat for a couple of minutes, or until they become very aromatic. Remove from heat and put aside to be re-introduced shortly.
Next, heat a few tablespoons of oil in a large pan. Add the curry leaves to the oil when hot, and fry for a minute, before adding the chopped onion. Stir together and cook over a medium heat for two minutes before adding the grated ginger and chopped green chillies. Cook everything together and, when the onion is looking translucent, add the crushed garlic and fry for further 2 minutes, stirring to ensure the garlic does not stick or burn.
Leave this mixture aside to cool while you prepare the chicken. Take care to remove any stringy white tendon from the chicken breast, and then cut it evenly into bite-sized cubes.
When the onion mixture has cooled a little, blend in a food processor, together with ¾ of the toasted cardamom and coriander (reserve the rest to add during cooking), as well as the bunch of fresh coriander, and the juice of 2 limes. Pulse until you have a rough paste, and then remove from the food-processor into a large bowl. Add the yogurt to the bowl, and mix together with the paste. Season the yogurt marinade with salt and pepper before adding the chicken to the bowl and turning to coat it thoroughly in the marinade.
Place this covered in a bowl, or ziplock bag, in the fridge overnight, or for a minimum of six hours.
When you are ready to cook the chicken, heat your implement of choice – bbq, griddle, or frying pan to high. If you are using a bbq or griddle pan, brush on a light coat of oil, for a frying pan you’ll need 2 tablespoons or so at least. Cook the marinated chicken pieces, turning frequently in the frying pan, until they are browned all over. If you are using a bbq or griddle, give each piece enough time to develop a decent char or griddle mark before turning to do the same on the next side. When the chicken is almost cooked sprinkle over the reserved spice powder and squeeze over the juice of half a lime.
Cut the other half of the lime into wedges, and arrange these around the cooked chicken on a large serving platter. Top with a stem of curry leaves to garnish, if you have some of these left over, or some extra coriander leaves in place of this if you prefer. A mint yogurt dipping sauce, such as the one in the previous post, would also be yummy alongside.
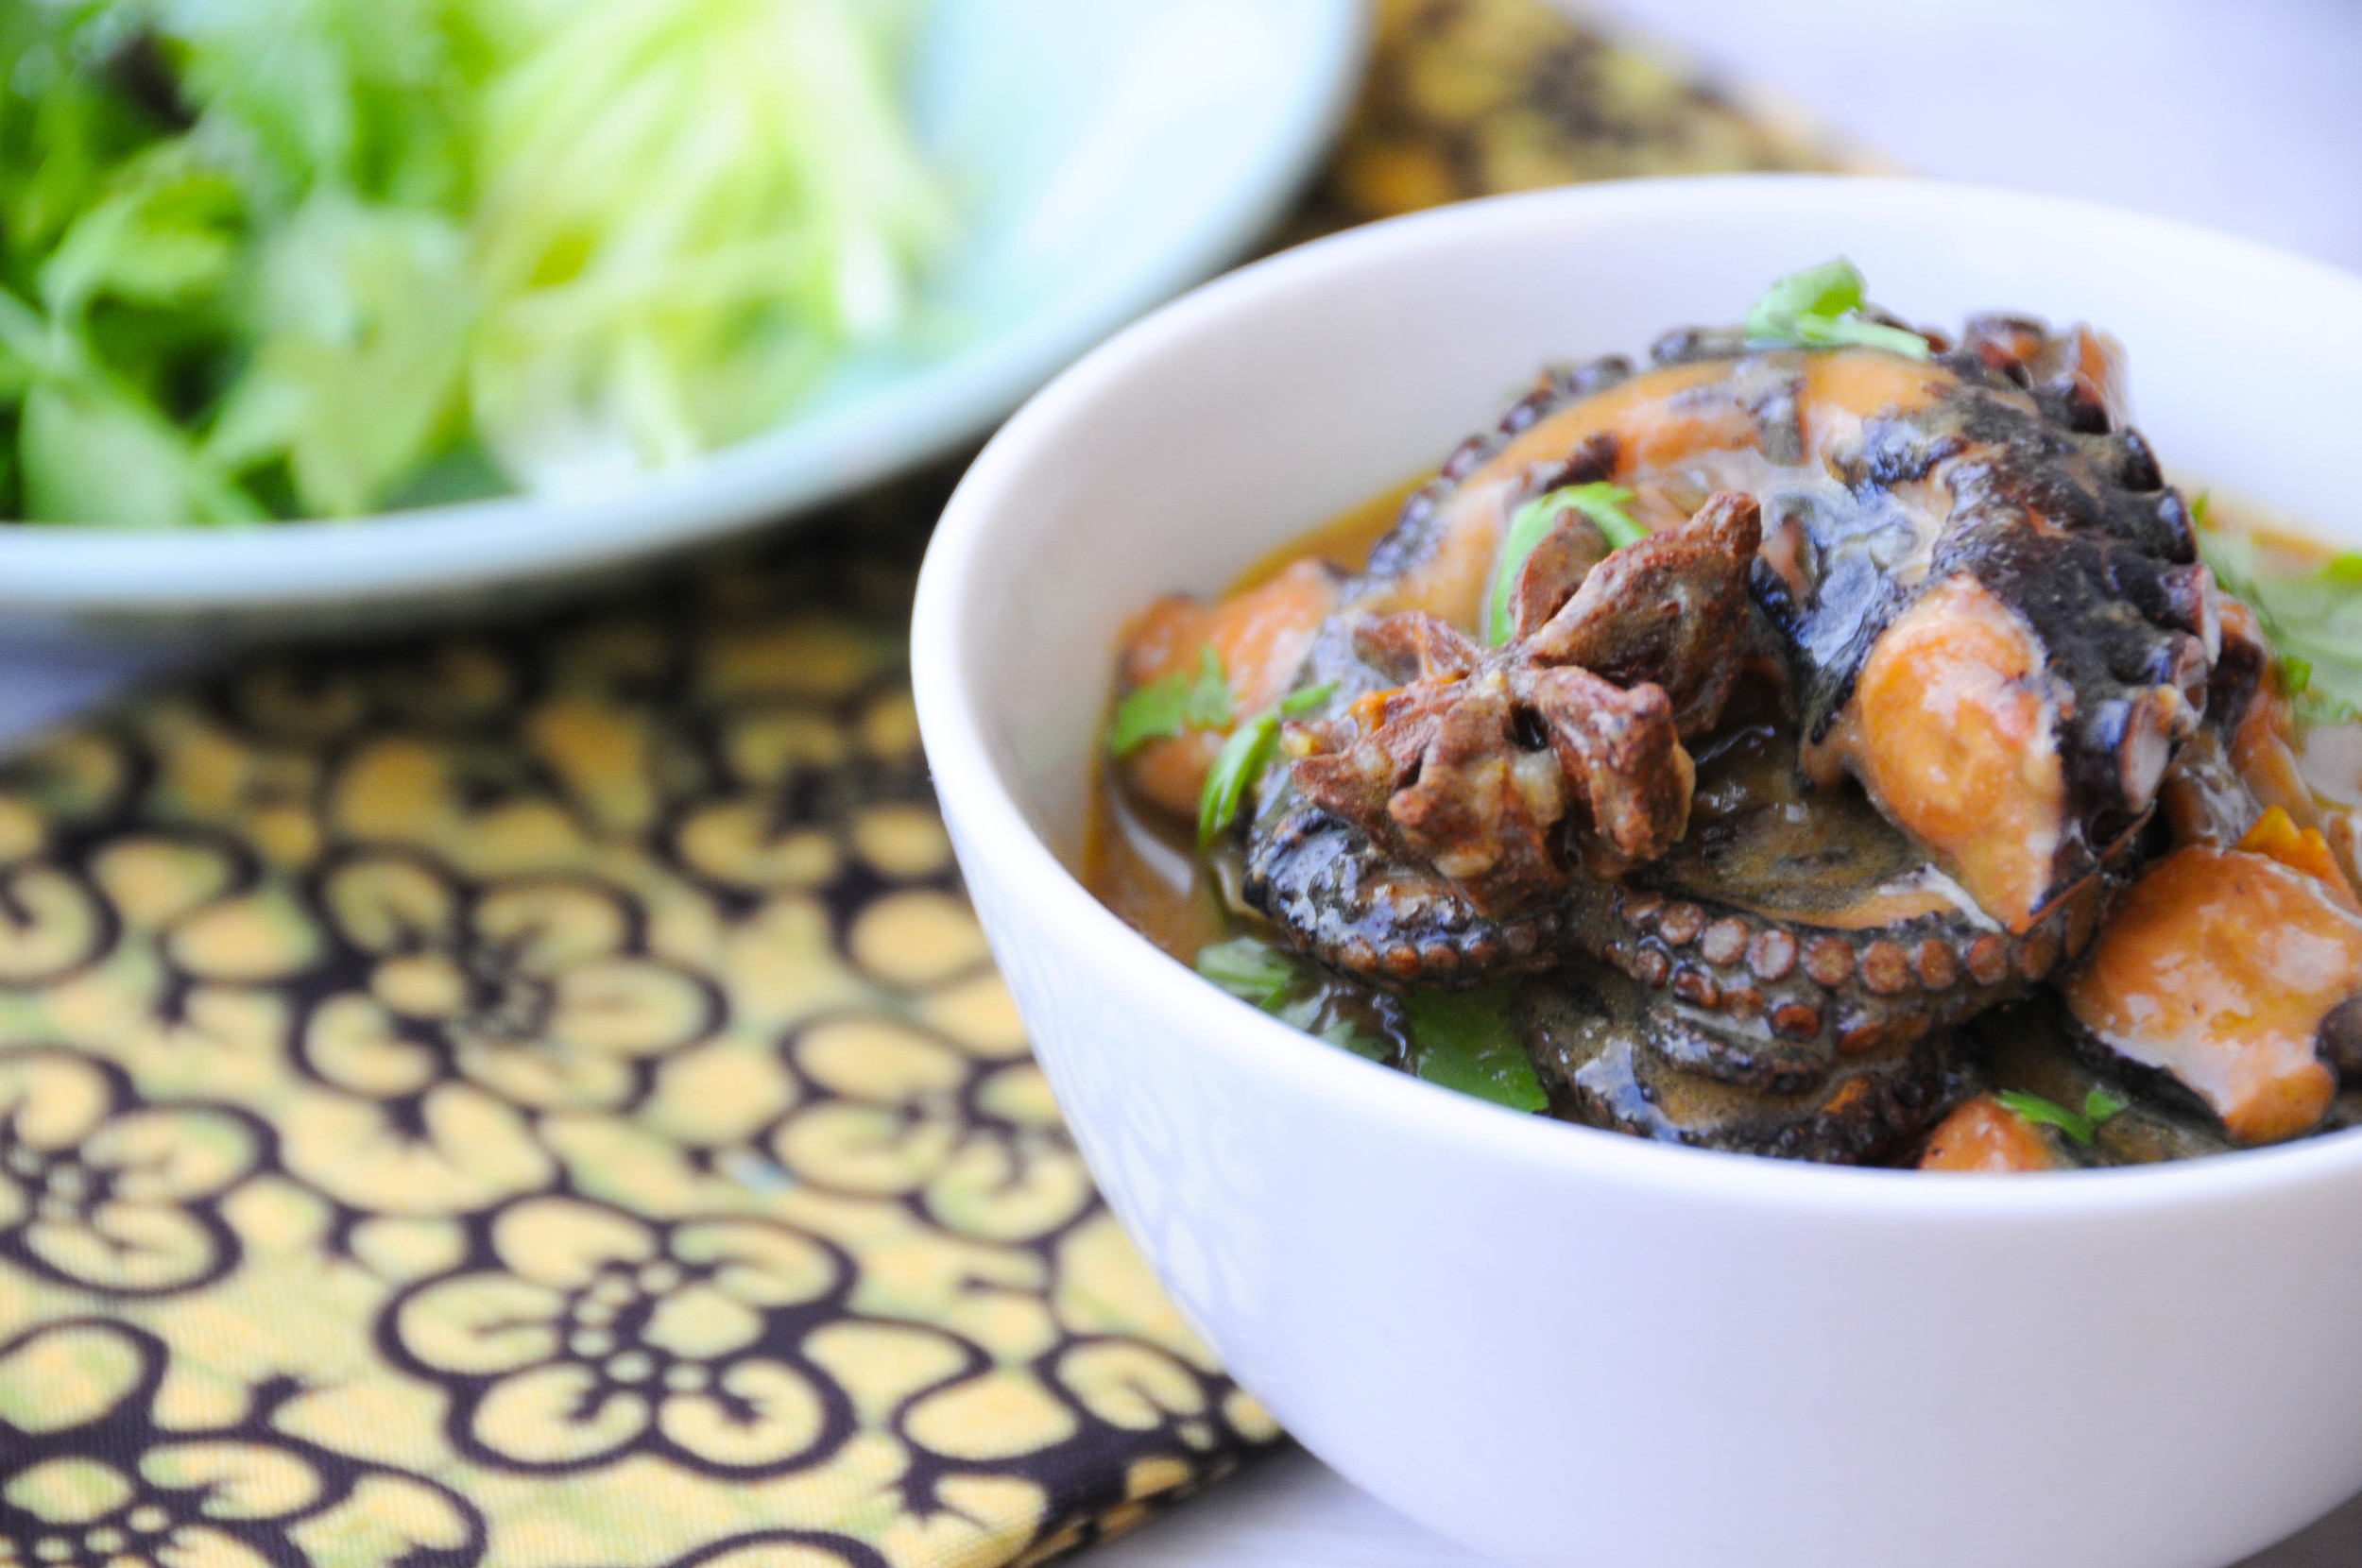
Lime Coconut Octopus with Star Anise
This dish is my take on the Zanzibari staple Pweza wa nazi, or ‘Octopus in Coconut.’ Given that octopus is something that can be readily fished by hand from the inter-tidal rock pools that fringe the coast at low tide, it is an ingredient that the locals are expert in dealing with. The preferred tenderisation method on Zanzibar’s shores involves beating the fresh octopus with a heavy club (see previous post), and while this might be maximally effective, clubbing is not an option in a small urban kitchen, so I had to experiment with alternative methodologies. The following multi-stage extravaganza is what I came up with. But don’t be put off, it sounds like more work than it is. Basically, there is an initial boiling, then some grilling, before the octopus is cooked together with the spices and coconut milk. The grilling stage is not so much about texture, but flavour, and a little bit about colour too, as chargrilling does give the octopus an especially appetising look. It’s all worth it though, as in the finished dish the octopus is tender without being over-soft, and not chewy in the slightest.
On Zanzibar, this dish is usually flavoured with just cardamom, but I’ve taken it in a slightly different direction by adding star anise and cinnamon as well. I love the classic combination of fennel and seafood, as usually encountered in European, and particularly French cooking – bouillabaisse for instance, so I was a little intrigued by the idea of amalgamating the cuisines a little. The following is where I ended up…
Ingredients
(Serves 4 as a main)
- 1 medium-sized octopus
- 8 cloves
- 4 cardamom pods
- ½ teaspoon of whole peppercorns
- 1 stick of cinnamon
- 2 star anise
- 1 teaspoon of ground turmeric
- Small amount of canola or sunflower oil
- 1 red onion - evenly chopped
- 3 cloves of garlic - crushed
- 3cm piece of ginger - finely chopped
- 125g cherry tomatoes - cut into quarters
- Salt & pepper
- 200ml coconut milk
- 150ml water
- 2 limes - juiced
- Small handful of fresh coriander leaves to garnish.
Begin by cleaning the octopus. If you have a very wonderful fishmonger, he or she may have done this for you, if not, make a slit at the base of the head using a large knife, and remove the small hard ball of cartilage that you find inside, along with any other head contents.
Bring a large pot of salted water to boil on the stove top. Add the octopus, reduce the heat to a low boil, and cook for half an hour.
Remove the octopus after this time and drain the cooking water. Allow the octopus to cool to a point where you can handle it, and then cut, starting at the tentacle tips, into 4cm pieces. At the top of the tentacle, where it is thicker, shorten the lengths a little so that they stay bite-sized. At this point, you can refrigerate the octopus for a few hours if you would like to continue to prepare the dish later in the day. Even if you want to continue with the preparation straight away, it is a good idea to refrigerate the octopus briefly while you get on with preparing the rest of the ingredients.
To prepare the spices, remove the cardamom seeds from their pods, and place these in a mortar and pestle. Add the cloves to the mortar and pestle, along with the whole peppercorns. Crush to a fine powder, before lightly toasting, together with the turmeric, cinnamon stick, and star anise, in a small dry fry pan over a medium heat for two minutes, or until the spices become fragrant. Then place aside briefly while you prepare the remaining ingredients.
In a deep saucepan heat a couple of tablespoons of oil over medium heat. Add the onions, and cook until translucent before adding the chopped ginger and crushed garlic. Cook together for a further 3 minutes, stirring all the while to ensure that the garlic does not stick. Take the pot off the heat at this point, and swap it for a large griddle pan.
Brush a griddle pan with oil, and heat until very hot. Take the boiled octopus pieces from the fridge, and, using a pair of tongs, chargrill these until the octopus begins to colour golden all sides and is showing some griddle nice marks.
Moving the hot griddle aside, off the heat, swap the pans again. To the pot containing the fried onion, ginger, and garlic, add the toasted spices, and, employing the tongs once again, the chargrilled octopus pieces. Add the quartered cherry tomatoes to the pot, and season with salt and pepper to taste. Stir everything together before adding the coconut milk and water. Bring to the boil then, once boiling, reduce to a simmer.
Cook for 40 minutes, or until the sauce has thickened to a curry consistency. Just prior to serving, stir in the lime juice, and do a quick seasoning test. Add more salt, pepper, or lime juice if you’d like.
To serve, fish out the cinnamon stick and star anise. These look pretty placed on top, and putting them in an obvious place can save someone an unsuspecting mouthful of very spiky wood! Scatter with the fresh coriander leaves, and serve.
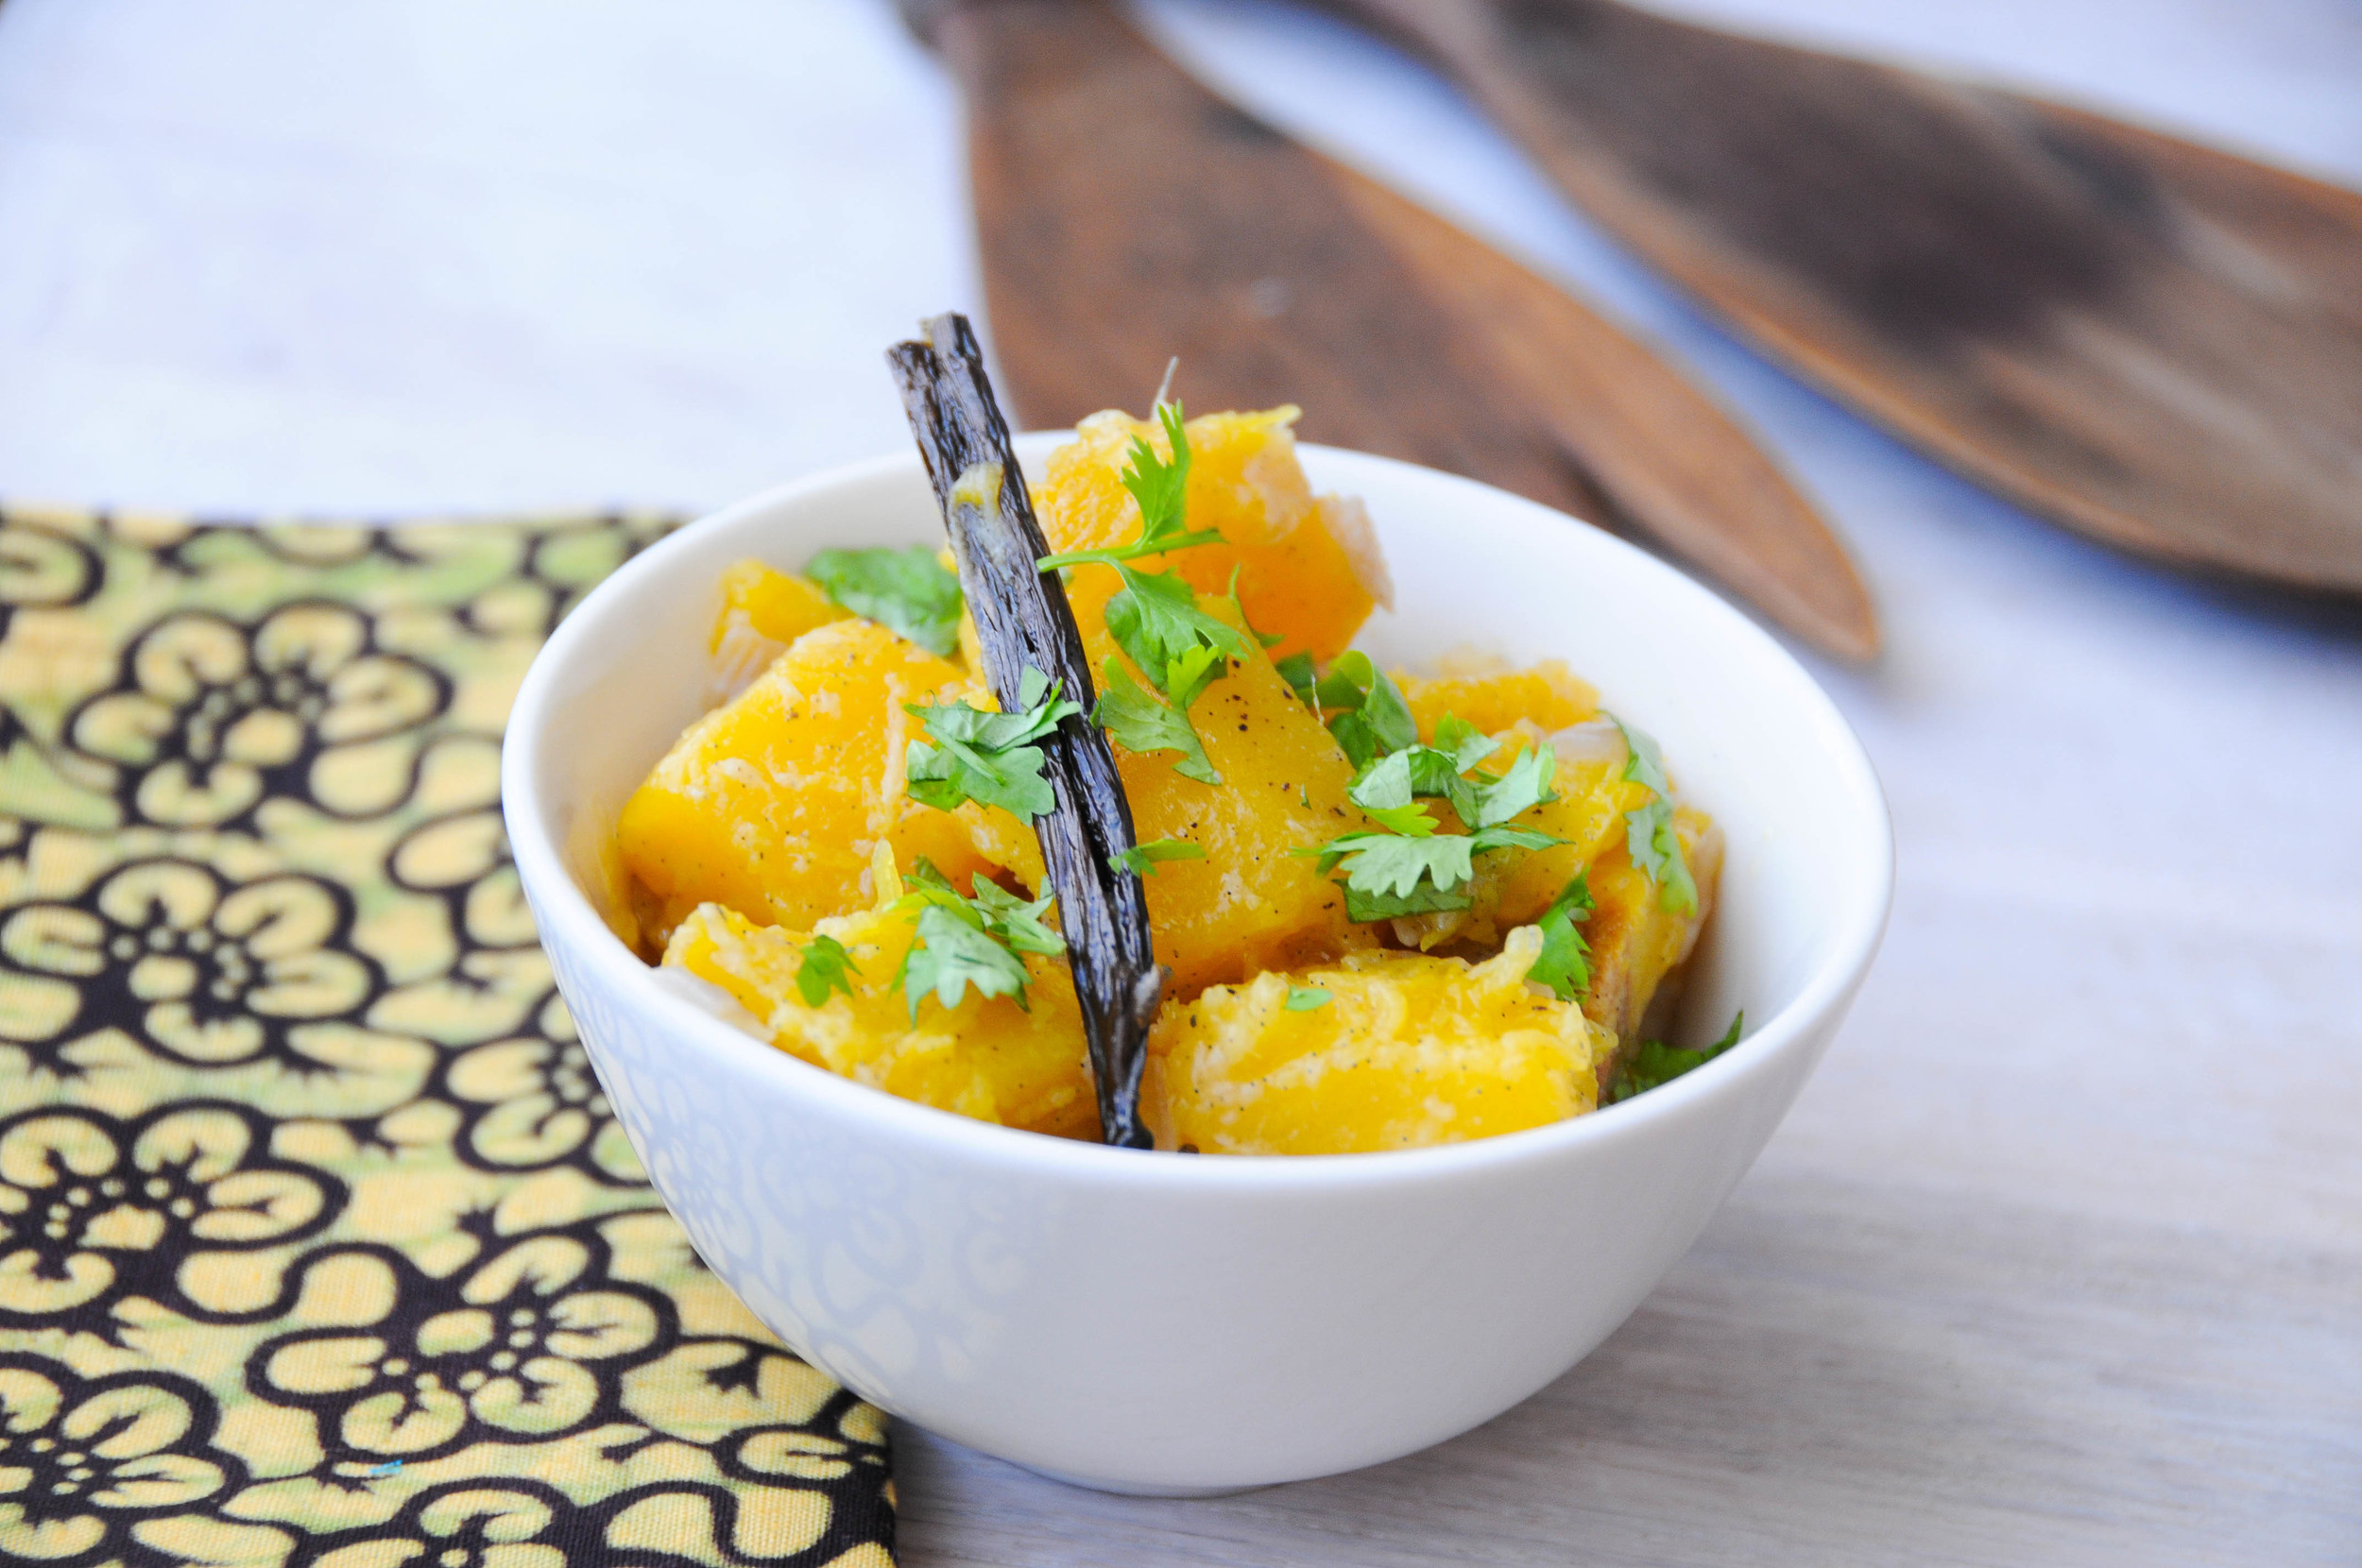
Vanilla, Cardamom, and Coconut Pumpkin
Like the Beef Salad with Passion Fruit dressing from Part I of this post, this pumpkin dish another example of the kind of sweet-savoury combos that characterise Zanzibari cooking. Also like the Beef Salad, I was a little wary of mixing the constituent ingredients together at first. While similar things were delicious when eaten on holiday, was I going to equally keen on them out of context and back at home? Pumpkin is one of those cross-over vegetables that gets the sweet treatment quite often – at this time of year, the obvious example is in American Thanksgiving dinners – pumpkin pie, pumpkin and marshmallow, all that kind of thing. Problem is, I have a fear of pumpkin in these forms that borders on the profound…
Once again though, it is the spices that save the day and work to strike the right balance in this dish. Vanilla and cardamom are pretty flexible and work in contexts both sweet and savoury. Similarly, coconut can be taken one way or the other. With a good sprinkle of salt and pepper added, and a garnish of coriander leaves, the pumpkin really works as a vibrant and surprisingly refreshing side dish. Alongside the bright pilau rice, the palette of orange and green also looks very festive.
Ingredients
(Serves 4 as a side)
- 20g butter
- 1 medium-sized pumpkin
- 4 cardamom pods
- 1 vanilla pod
- 200ml coconut milk
- 200ml water
- Salt & pepper
- Handful of fresh coriander leaves to garnish
Cut the pumpkin in half, and use a spoon to scoop out the seeds, as well as the fibrous layer directly beneath the seeds. Use a sharp knife to carefully remove the skin of the pumpkin, and then cut the flesh into 3cm cubes.
Melt the butter in a large casserole pan over medium heat. Add the cardamom pods and gently stir these around for a minute, before adding the cubes of pumpkin. Fry these gently, stirring occasionally, while you prepare the vanilla pod.
Cut the vanilla pod in half lengthways and, using a knife with a sharp point, scrape out all the tiny black vanilla seeds inside. Add these to your pumpkin, along with the empty vanilla pod, which will continue to add flavour as the pumpkin cooks.
Now add the coconut milk and water, along with a good seasoning of salt and pepper. Cook until the pumpkin is soft all the way through, approx. 20 minutes, (a small knife inserted into the centre of one of the cubes will confirm this).
To serve, arrange on a platter, or in a large bowl, and scatter over the fresh coriander leaves. I think that, when possible, it is always nice to display the whole spice where these have been used, so I leave the cardamom pods in, and would suggest placing the vanilla pod atop as a garnish. Alongside the bright orange of the pumpkin, and the green coriander leaves, the deep wood colour of the pod looks rather nice I think .
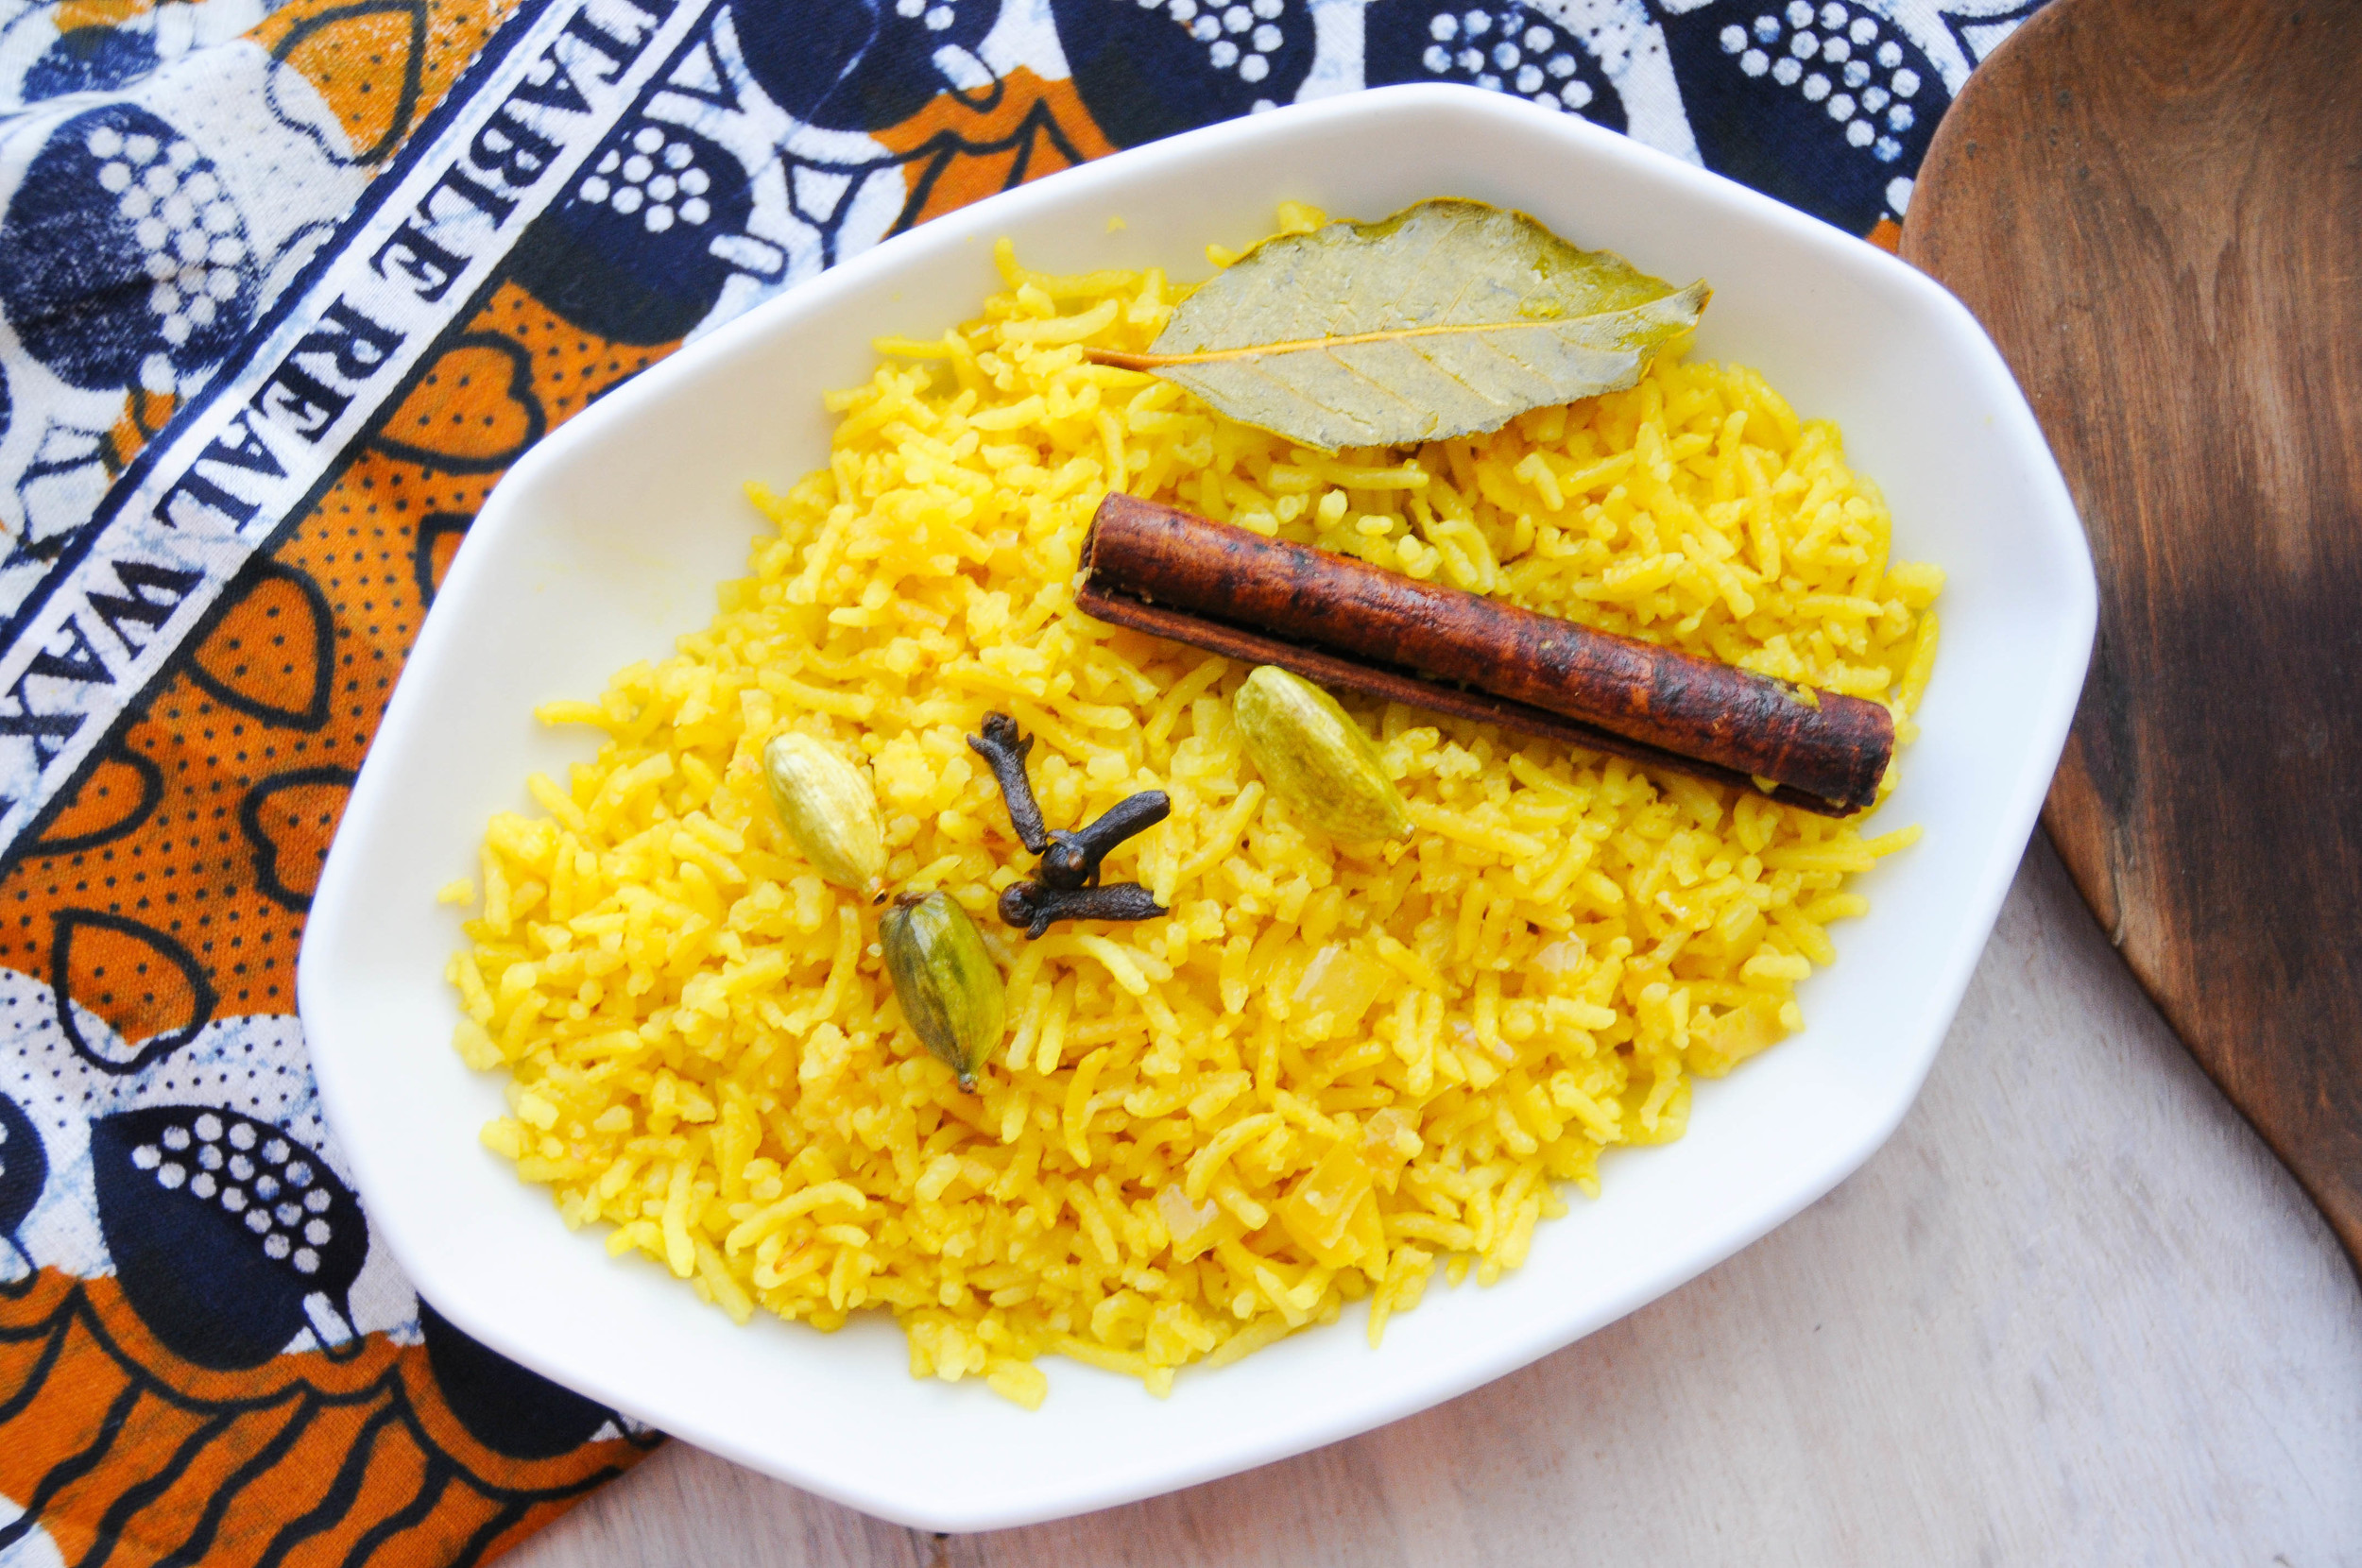
Zanzibar Spice Pilau Rice
You could serve any of the above dishes with plain basmati rice, but pilau, with its beautiful colour and buttery richness is much more fun. It also offers an opportunity to sneak in some more spices, and this, as I'm sure you've thoroughly picked up by now, is really the name of the game in Zanzibari cuisine.
Cooking rice to perfection is certainly a bit of an art. There is a lot of advice out there on how to avoid gloopy, over-cooked grains, though I cannot say I have experimented with a wide variety of methods as, my fear of over-cooked rice being quite extreme, I have stuck for years with a method that works for me. Unfortunately, this method isn't particularly scientific, so I hope that, if you try it, you also experience success. Read on for details, and good luck!
Ingredients
(Serves 4, very generously, as a side)
- 400g basmati rice
- 50g butter
- 1 brown onion - finely chopped
- 4 cardamom pods
- 8 cloves
- 1 cinnamon stick
- 2 bay leaves
- 1 heaped teaspoon turmeric
- 1 teaspoon salt
So, first thing to do for my not-exactly-fool-proof-but-has-always-worked-for-me rice plan, is to thoroughly rinse the rice. To do this, place the rice in a saucepan or bowl, and then fill with water. Next, drain the rice through a colander, and then return the rice to the saucepan, re-fill with water and drain again. Do this until the water that you drain is almost clear, free from the majority of the starch that will make the first few passes very milky. When you've reached this stage, re-fill the rice saucepan with water and set aside to soak for between 20-30 minutes. After this time, drain the rice one again.
In another saucepan (the one you intend on cooking the rice in), fry the onions over a medium heat in 30g of the butter. When the onions are soft and beginning to colour, add the turmeric, cloves, cardamom, bay leaves and cinnamon stick. Stir everything together and cook for a further 2 minutes - the turmeric should colour everything a lovely yellow. Next, add the drained rice and stir to combine this with the onion and spices.
Now for the not-so-scientific bit - place your index finger in the saucepan (near, if not exactly on the base) and stand it upright in the rice, (given you've just added the rice, the temperature won't be so high as to make this dangerous). Pour in tap water until this reaches the base (i.e. the furthest part) of the second knuckle of your index finger. (I know that this shouldn't work, because people have different sized fingers etc, but I first heard of this method many years ago in Hong Kong (a place of consistently perfect rice), and as I said earlier, good results have ensured that I've never strayed). If you have less faith in index finger rice magic than me, then I hear that adding twice the volume of water to rice also works wonderfully.
Now, cover the pan with a very tight fitting lid, and place over a medium heat until the water begins to boil. Without lifting the lid from the pan, reduce the heat to low, and continue to cook for 20 minutes. After this time has elapsed, you can do a super-quick lid-lift to check that all the water has been absorbed. Look for small holes in the rice - this in an indicator that all has gone according to plan. Pop the lid back on, and set aside for another 5 minutes to steam and become fluffy.
When this time has elapsed, lift the lid, and fluff the rice with a fork. It should be dry and lovely (and if it's not, then perhaps you fingers are particularly out-sized). Remove the cloves from the rice, and maybe the cardamom pods too if you are feeling particularly generous. The cinnamon and bay leaves are sufficiently large not to be a choking hazard!
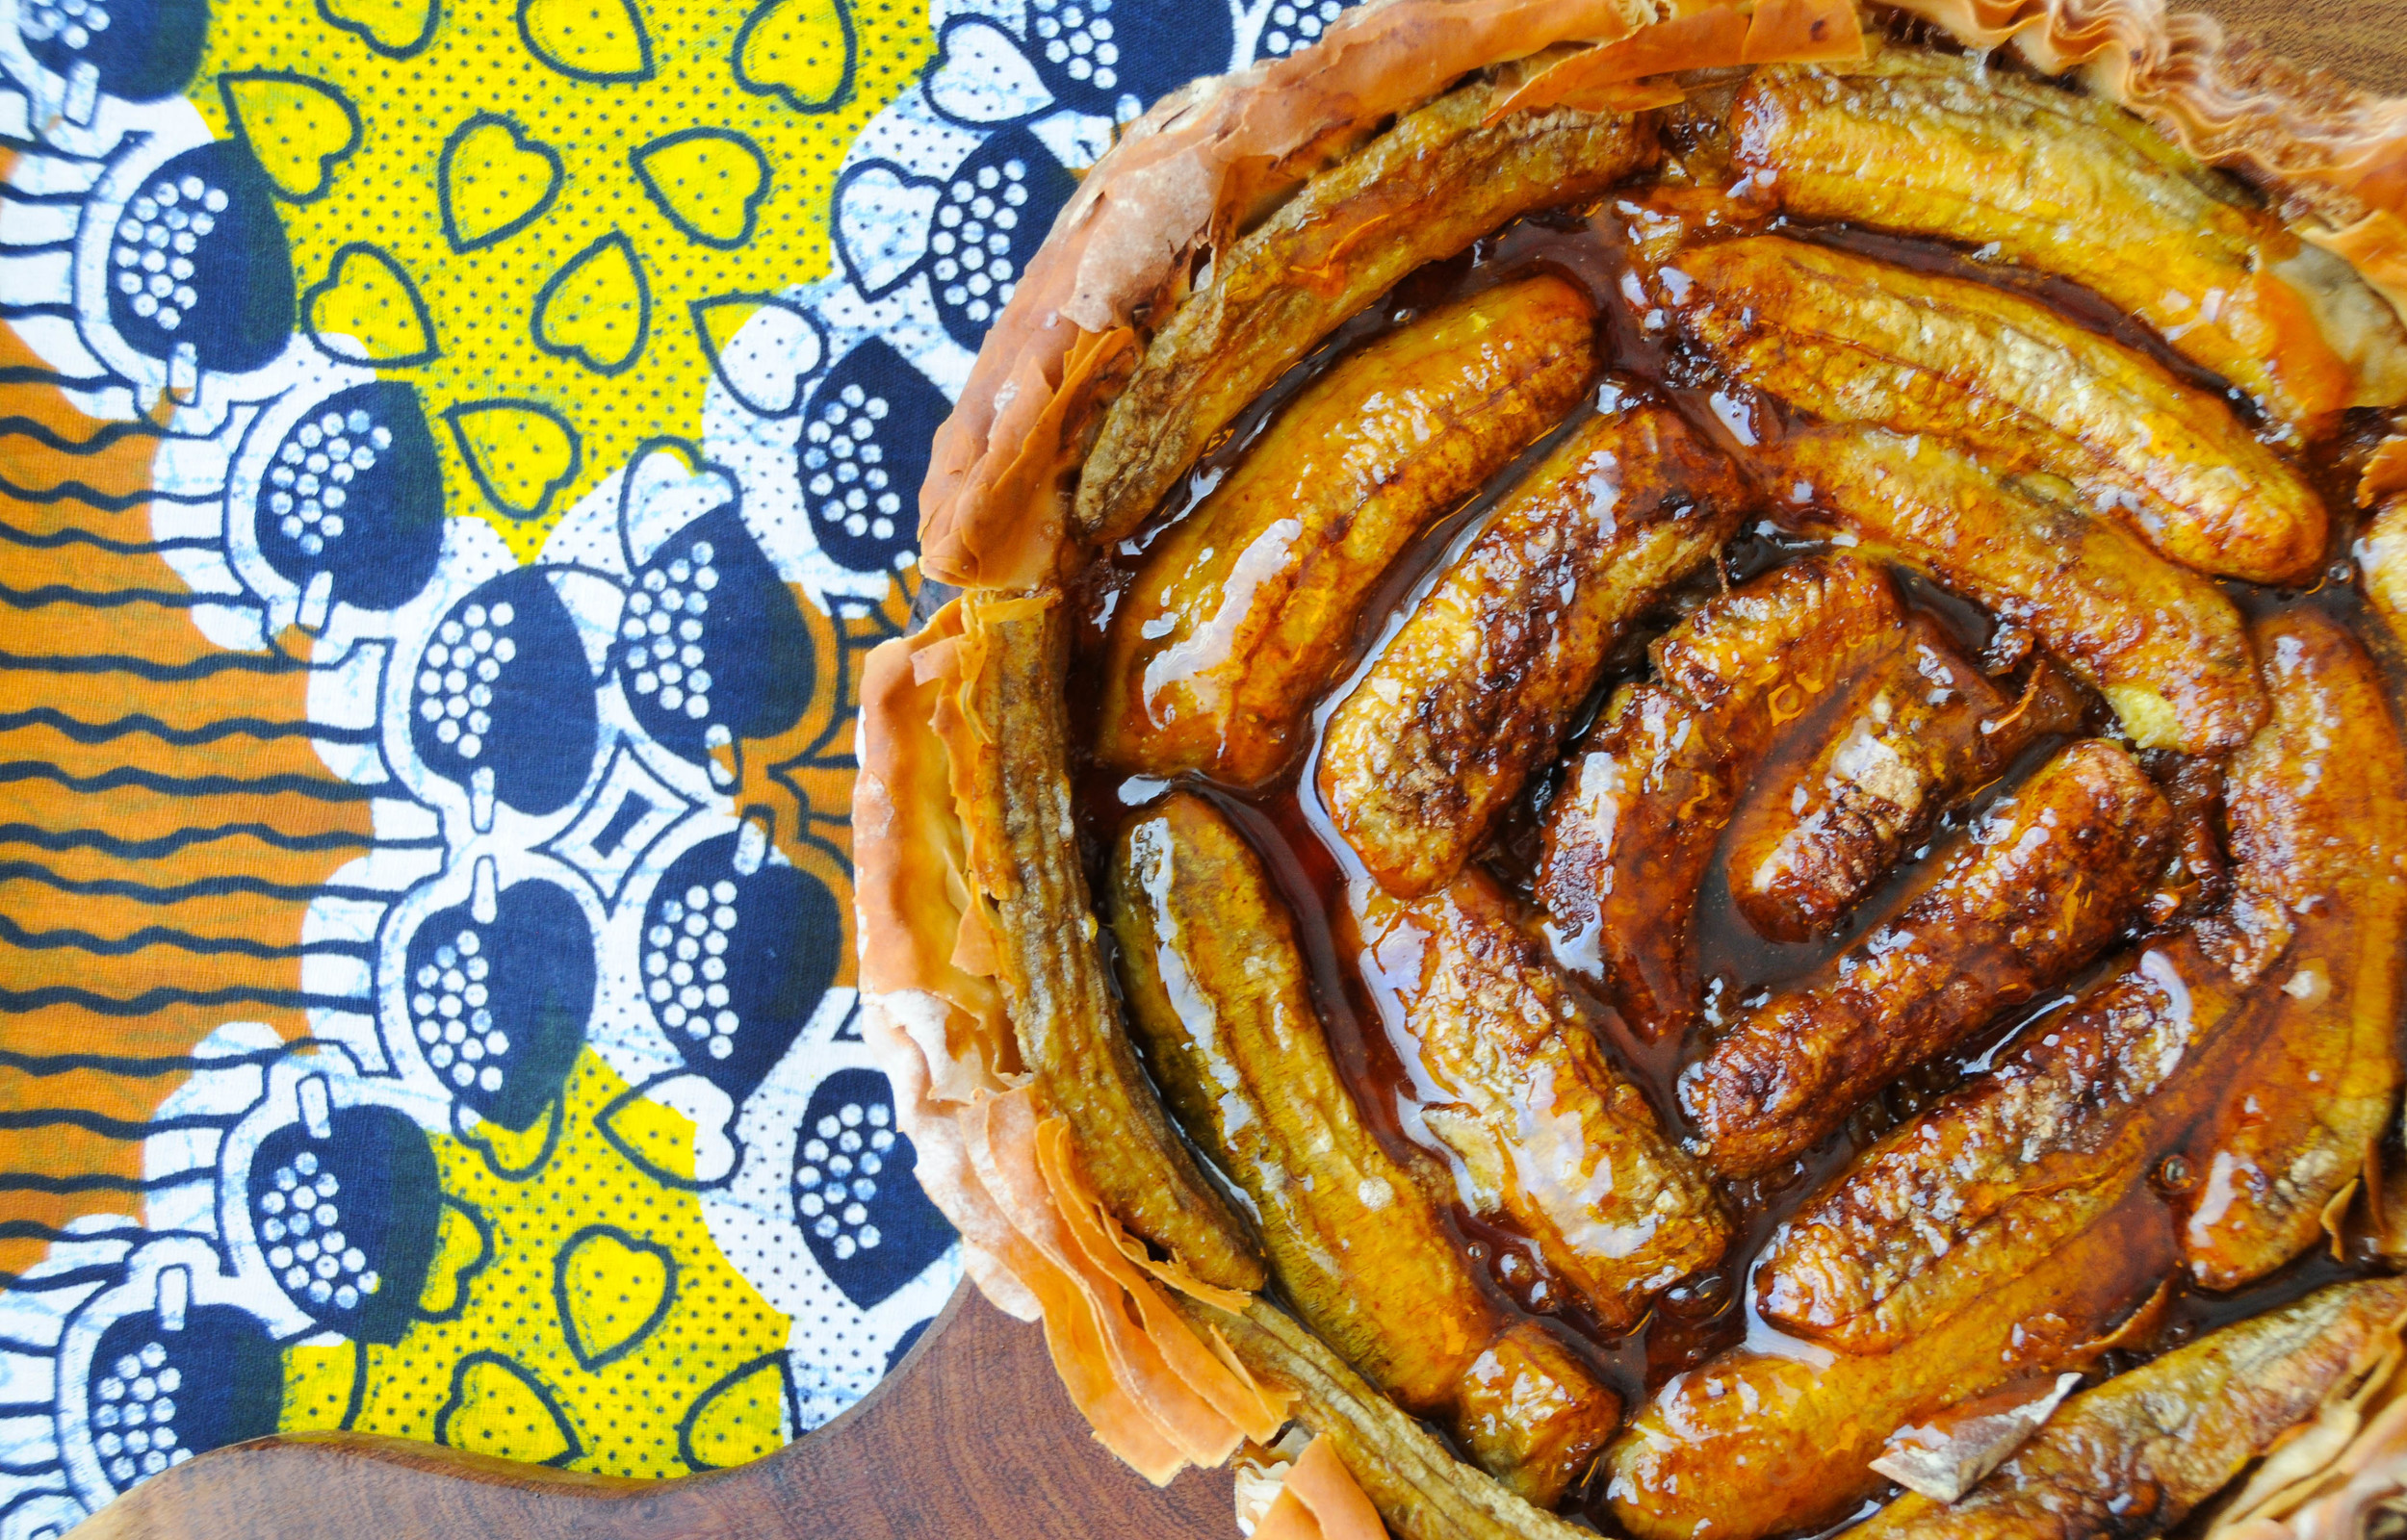
Banana Caramel Tart
I was tossing up whether to include this recipe. It is a very simple variation on a classic tarte tartin, so not wildly original, and it uses shop bought puff pastry (a small sin). On the other hand though, there are bananas, and cinnamon, which keep it relevant in terms of the whole Zanzibari thing, and, warm caramel is always additive in my experience. The decider however, was that I figured couldn't make legitimate claims to a 'feast' without a dessert, so here it is...
Of course, if authenticity is a concern, then you could always opt for the earlier 'Spice Island Spice Cake' instead. Served warm, with Chantilly cream, this would also make for a lovely end to a meal of any of the dishes described here.
Ingredients
(Makes one medium-sized tart of approximately 6 slices)
- 1 large sheet of puff pastry
- 2 bunches of small finger bananas (approx. 10 bananas)
- 100 caster sugar
- 30g of unsalted butter + extra for greasing
- Handful of light brown sugar - for sprinkling
- ½ teaspoon of ground cinnamon
- Vanilla ice cream to serve
Pre-heat the oven to 180˚C. Grease the base and sides of a medium-sized flan tin with a little of the butter. It is very helpful to use a flan tin with a detachable base as this will make things a lot simpler when you come to extracting the finished tart. Puff pastry has a lot less integrity than short crust and will need to be lifted carefully from the tin if it is going to make it in one piece. If you are using a puff pastry block, roll this to a thickness of 0.5cm and then carefully lay it over the greased tin. If you have a pre-rolled puff pastry sheet, then simply lay this over the tin. Gently press the pastry into the edges of the tin, leaving the excess to hang lightly over the fluted rim. When you have done this and everything has been pressed into place, take a sharp knife and cut away this extra pastry from the sides. This does not need to be too perfect as, unlike with short crust pastry, everything will puff and become uneven in the oven, so just make it as neat as you can.
Next, lightly prick the pastry all over using a fork. Blind bake for 10 minutes, or until the pastry has only just begun to colour, and then remove from the oven and set aside to cool slightly.
Take this time to prepare the bananas by peeling, and laterally slicing the bananas into two. Next is the fun bit - getting these to all fit as elegantly as possible in the circular puff base crust. My only, kind of obvious, bit of advice is to use any slightly larger bananas around the outside edge, and smaller ones as you move towards the centre. It's all a bit of a jigsaw, and you will have to trim the most central bananas down to size a little. When you have the base concentrically covered with bananas as best you can, sprinkle over the light brown sugar, just a small handful (about 3 tablespoons) is enough. Also sprinkle the cinnamon evenly over the bananas.
To prepare the caramel, place the sugar in a small pan, preferably a light-coloured one, aluminium for instance, if this is available, as it is easier to notice the sugar change colour as it caramelises against a pale background. Heat the sugar over a medium heat - after a few minutes, if you watch carefully, you will notice that it begins to melt around the edges. Keep a close eye on it, after about 5 minutes or so, when approximately a quarter of the sugar has turned to liquid, give the caramel a stir. Keep the pan on the heat, and continue to stir for approximately another 5 minutes, until the sugar has completely liquefied and is the colour and texture of a dark runny honey. It is important to have the patience to let the sugar caramelise completely before removing from the heat, but on the other hand, if yours is looking ready before the 10 minutes is up, don't hesitate to take if off the heat as it can quickly burn if left too long.
Next, carefully add 2 tablespoons of tap water the caramel. This will sputter as you do so, so make sure to keep you hands clear or protected. Stir the water through, and then add 30g of the butter, continuing to stir this through.
Pour the caramel evenly over the bananas, then bake for 20 minutes until the bananas have softened and the edges of the pastry are golden brown. If your pastry is beginning to look too toasted on the edges before the bananas are ready, prepare a rough ring of aluminium foil and place this lightly on top to protect them from browning further while the bananas finish cooking. Serve warm, with a couple of scoops of vanilla ice cream.
Hot caramel, cold ice cream, and soft banana - 'Zanzibari' or not, you can't go too wrong...


